Permaculture
PermacultureWater
I figured to mention this first because, at least where I am from, municipal water supplies have chlorine (or chloramine) added in efforts to sanitize the water for safe drinking, etc., which is good because it can kill bad bacteria but bad because it can also kill good bacteria (and other organisms), which are beneficial in aquaculture. Using fish aquariums / ponds as an example, which rely on Nitrosomonas to convert ammonia to Nitrites and Nitrobacter to convert Nitrites to Nitrates, where chlorine is harmful to both; ammonia, nitrites, nitrates and chlorine are all harmful to fish but with the nitrifying bacteria present in the water, you are only left with nitrates, if the cycle is in full effect. However, nitrates feed aquatic plants, phytoplankton, other algae and more, which then continue the food chain, feeding zooplankton, fish, snails, and other aquatic (and non aquatic) organisms. And these ecosystems can also be hacked to contain the symbiotes that we deem beneficial to what we are trying to accomplish; I really enjoyed learning about organic rice farming and ducks, rice fish, azolla, where the waste from the ducks / fish are converted into nitrates for the azolla and rice, where the ducks and fish eat the azolla, where the beneficial bacteria are completing the loop. When the rice is harvested, it leaves more available nitrates for more growth and more harvesting. So yeah, let's not use chlorine in aquaculture :smile: You can rid of chlorine by just letting it sit, stirring it up a bit to allow for oxygen transfer into the water and UV (sunlight) also expels chlorine from the water and usually it is gone or nearly gone within 48 hours and you can speed this process up with active aeration such as an aquarium bubbler, which may speed this up to as little as 12 hours; there are other methods such as using ascorbic acid (vitamin C) or other additives but I have not experimented with these. Chloramine is a different story, where you will most likely have to use some sort of additive to remove it from your water. You can find out what is added to your water by looking at your municipality water report, which will state what minerals or other chemicals / sanitizers that are added to your water and usually you will see chlorine or chloramine.
Rain water collection
This kind of happens by nature itself, meaning rain water makes its way into the water shed, which ends up in a river, lake, pond, ocean, aquifer, etc. But again, we can interfere to intentionally collect the water where we need it, being a pond where we raise / harvest fish, a cistern where we collect water to be filtered for drinking / cooking, a garden which we grow produce or a simple barrel collection system which can be used to help us through a dry spell.
Certain planting techniques can also help stop or slow down soil erosion by controlling how water flows through a certain area during heavy rainfall.
Composting
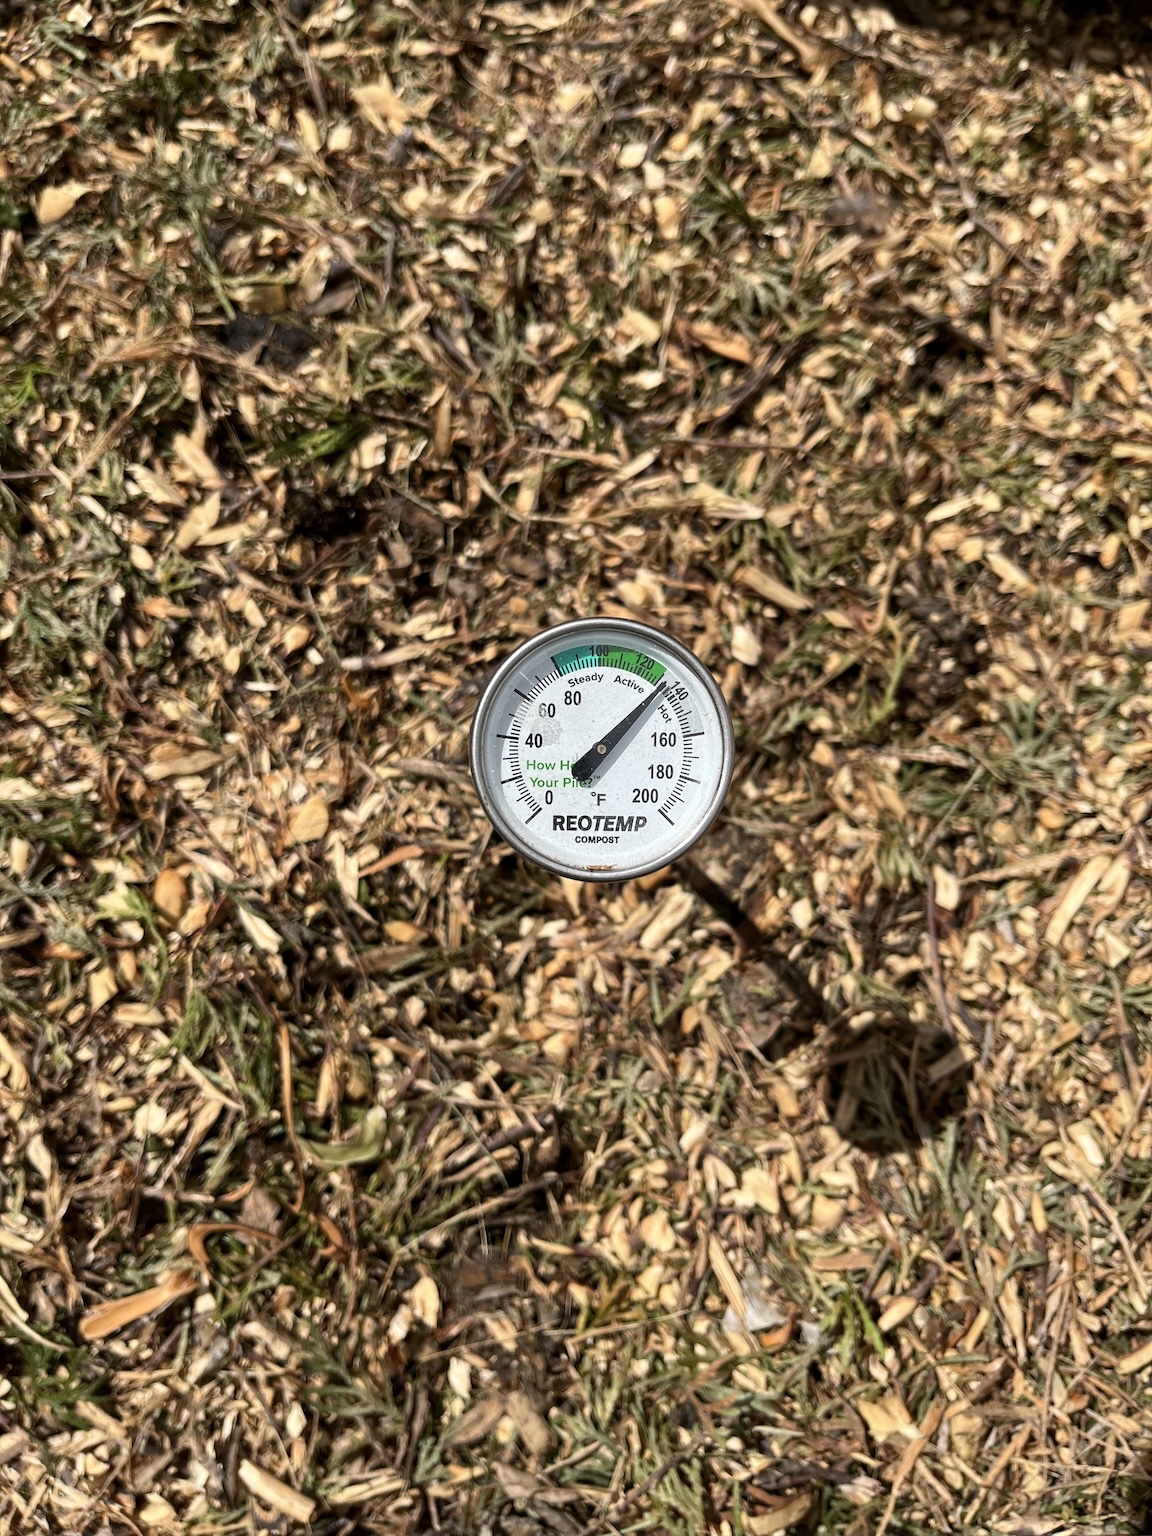
Before recycling by municipal collection, I like to think about how I can use the waste myself. Composting is my first go-to; things like food scraps, grass clippings, twigs, leaves can be composted and are usually what we think of when referring to compost. After blindly composting for awhile, it would take me 1-2 years to convert a pile from waste into usable compost but I had no method aside from saving scraps year round, grass clippings in the summer and leaves / twigs in the fall. My game improved once I started researching and found out about proper Carbon to Nitrogen (C:N) ratios. Using the Berkeley Method, you can turn a pile in as short as 18 days but in theory, even shorter. I found that my pile had way too much nitrogen and needed "more browns" i.e. carbon. Most resources refer to an optimal 25:1 ratio of browns to greens (C:N) to get a good "hot" compost going, where the first few days to a week you will be in whats referred to as the mesophilic phase which gets up to roughly 105°F, where you then go into the thermophilic phase up to 150°F+ and back down. If you monitor your temperatures after composting with the ideal 25:1 ratio and you fall into these ranges, you may have a successful turned compost but 18 days is hard to come by, I shoot for 3-6 months, which is dictated by what I have in supply. There are some other factors aside from the ratio that come into play, which are moisture, oxygen and composition; the moisture when you get started should be wet but not too wet (if you take a handful of your compost and squeeze it, only a few drops of water should fall, so not completely soaked, also it should not form into a mud ball, it should fall back apart but not crumble as if it were too dry) and oxygen can be achieved by having enough aeration in your pile, where airflow is optimal (you do not want an airtight compost bin, compost that is too compacted, or too small of a pile.. 3x3x3ft minimum). Composition is tricky because you can only use what you have on hand and to avoid buying material for compost if you are composting to recycle; compost composition has a heavy soil science aspect to it.
There are some mathematics to proper C:N, you should start by looking over a table of common materials added to compost and what their C:N ratios are and you can divise how you need to compose your compost to achieve your total 25:1 (or similar) ratio. Many of these tables exist on the internet and just about every book on composting has one; I own a few but one example is in "Gaia's Garden: A Guide to Home-Scale Permaculture" (P. 66). See bottom of page for a complete list of books I found useful on Permaculture in general. I have some tips below on what I found useful in composting.
The Berkeley Method is inspiring but not practical for me because I add what I have when I have it; if I had a farm with access to much more material, it may be easier to craft the perfect mix, so I'll provide knowledge from my experience in composting at home. Grass clippings clump up when you add them too thick, so I add them in thin layers to my "active" compost that I am building and then add the excess to a second pile, which is my inactive pile where I store excess. When I say layers, I am referring to the "Lasagna" layering that is common in methods of composting, where you build layers one on top of each other (C -> N -> C -> N, and so on); this is how I build my initial pile, to get things going. Leaves / twigs are a good addition but even better when in smaller pieces, leaves can also form a layer or "mat" that won't let water through (similar to grass clippings set too thick); twigs or wood chips are great for composition as they can retain some water but also provide for aeration as they don't clump together, so some form of wood is a must for me, even if I don't have it from the start. Usually when your pile is too wet, its usually from too much water (duh) or from too many greens; to fix the former, add a sheet of cardboard to the top of your pile to divert some water away from the pile if you have heavy rain and for the latter, add more browns. My initial issue was not enough browns but once I added cardboard into the mix, this helped greatly; I have a paper shredder and usually shred my cardboard after peeling any labels or tape off completely, including the residue. Safe cardboard is brown cardboard without "glossy printing", where I am referencing cardboard with images printed on them on all sides; most brown cardboard you see with words or shapes printed are usually in carbon or soy based inks (your normal brown shipping boxes). However, some of the image-printed cardboards, you can de-ply the printed layer off them, where they are often normal cardboard underneath. Sometimes labels are hard to take off and de-plying is also useful once again; most cardboard is paper, then corrugated thicker paper giving the cardboard its structure, then paper again where sometimes more industrial heavy duty boxes have more than just these 3 layers. I avoid anything that is not brown with basic ink printing; usually this is shipping / product boxes, large fruit trays used to hold bulk fruit by grocery stores. Aside from the ply cardboard, there is pulped cardboard like egg cartons, etc., which is also kosher for composting. If you don't have access to a shredder, a bucket of rain water is good to soak the cardboard and then it rips very easily. Ok, off the cardboard tangent but this is a great brown to add to your pile if you only had access to leaves / twigs like me before, which were a whole lot less than greens (grass clippings and food scraps). Just make sure to rip or shred it enough that you aren't creating the "matting" issue explained above like with grass / leaves. After I have enough "Lasagna" layers, I dig holes in the pile to bury the food scraps, don't add it directly to the top, unless you want to attract pests. Certain scraps like coffee grounds have a higher carbon than nitrogen ratio, where these are a great addition and also add a near-soil like composition to your compost (however, I save a good portion of coffee grounds for my vermicompost, see below for that). If you have access to straw / hay, these are also good additions but if your pile is over 50% of them, you may start a fire, so be careful with composing a pile that is possibly bound to get too hot; this also brings up the fact that you should not place your compost pile too close to combustibles, home, etc. Wood chips are also great if you have them (also see sheet mulching). Sand does not add much to aid in composting but it can aid in soil composition, depending on what you are planning to use your compost for, so if you have excess sand, it can help allow for better airflow and if worms are present in your pile, they need some form of grit to be more beneficial to your pile. Of my food scraps, I have three categories: the "bulk majority" goes into a small container under my sink which I empty into a sealed 5-gallon bucket weekly (it is discouraged to seal your compost because it can harbor bad bacteria due to anaerobic conditions you create when you don't allow oxygen exchange but there is debate and I accept the risk; do your own research but I am not a fan of those carbon filter compost storage tins / bins, I use food safe buckets which I get from my local bakery), the second is "coffee filters / grounds, tea leaves" which I store separately to use for my vermicompost and then excess goes into the the outdoor compost, the third is "egg shells" which I save after rinsing and then when I have a decent amount, I put them in the oven organized into a flat layer at 400°F for 10 minutes to dry them out, then I use an old upcycled small blender to turn them into crushed egg shells, which I use as grit in my vermicompost but excess can be added to the outdoor compost which helps with composition and as a calcium source.
Lastly, don't forget that its not just about what you add to the pile, its also about what the pile attracts. Alot of the work done (aside from the C:N reaction) is by the beneficial microbes that are present in your soil and also the worms, nematodes, etc. When I finish a pile, I always keep a little bit to start the next pile with as kind of a "starter" with beneficial workers already present to continue their work. But even outside of the active compost, they will also continue their work improving the soil quality wherever you happen to use the compost. Elaine Ingham has literature that goes into great depths on what beneficial organisms are present in a good compost, definately worth reading!
Vermicomposting
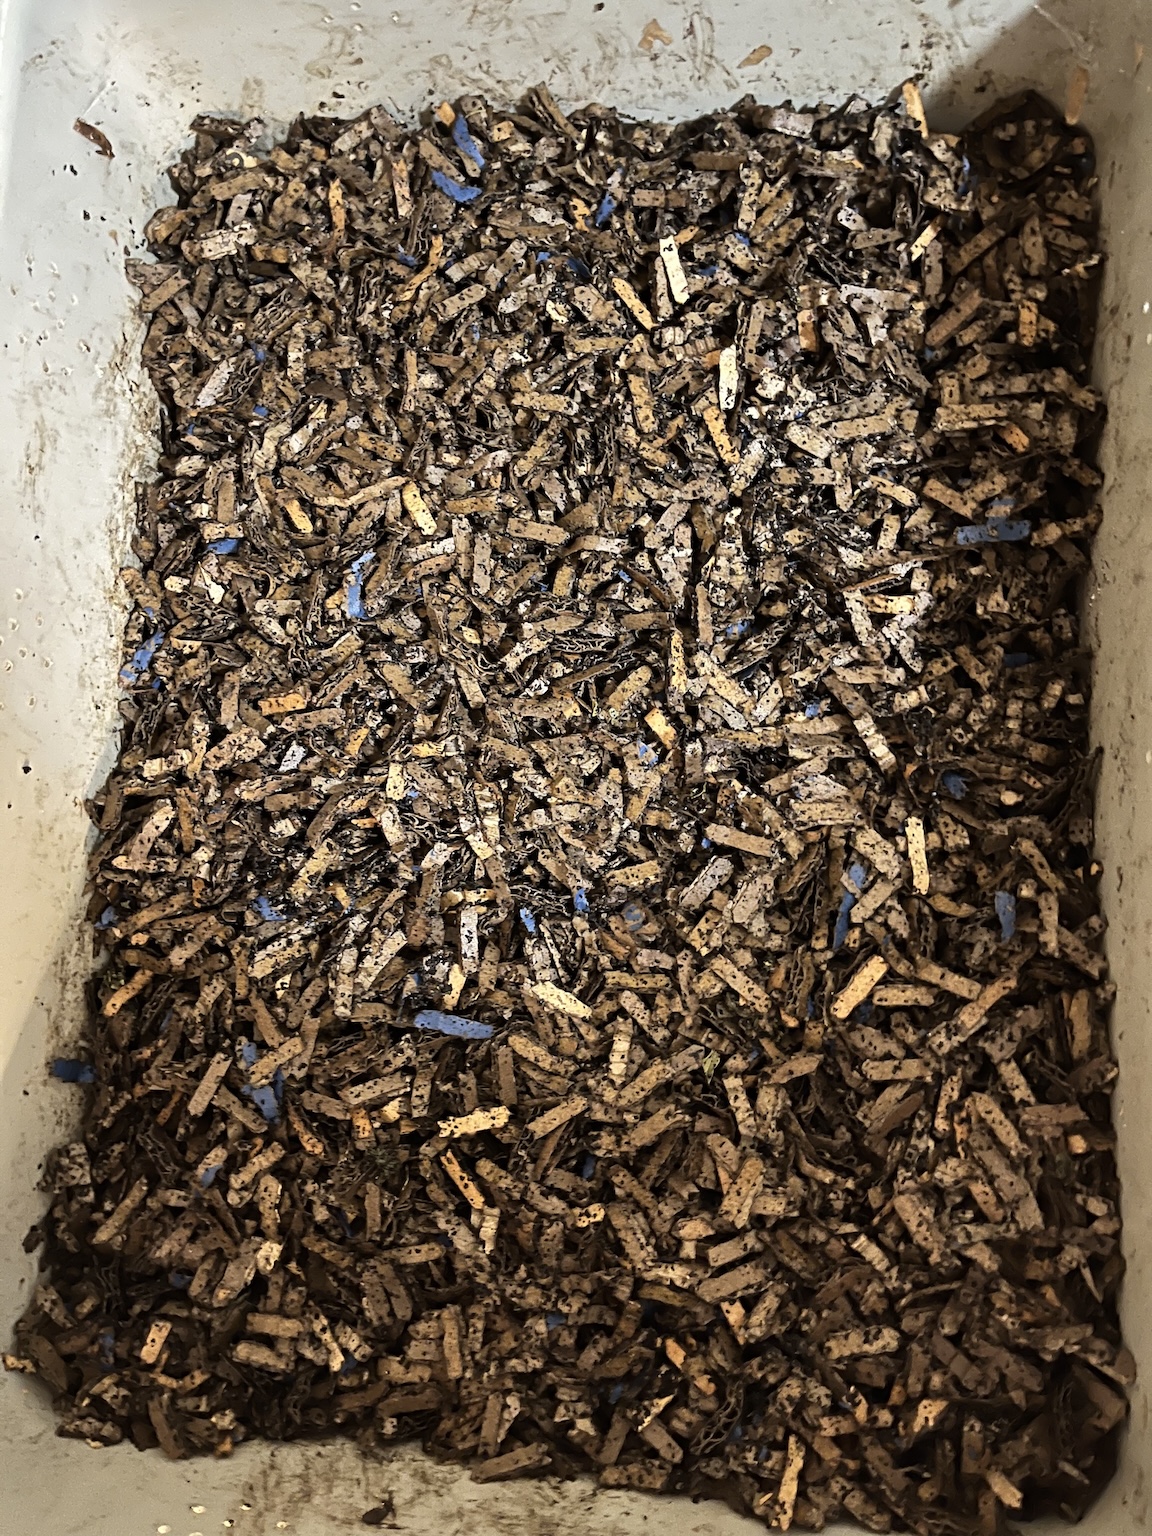
I have been maintaining vermicompost for a few years now, mainly with red wiggler worms (Eisenia Fetida); but other forms of vermicomposting exist such as composting with Black Solder Flies, which are very beneficial in their larval stage similar to worms.
I use two 21" (W) x 15" (D) x 7" (H) Meat Lugs, which are essentially food safe heavy duty plastic containers used by restaurants or the like. Red wiggler worms are surface-ish dwellers and don't go that deep (such as Nightcrawlers do), so anything deeper than 10-12" is proably overkill. Between both of these bins, I harvest around 30 lbs of worm castings twice a year (60 lbs per year)
I started with 2000 worms and split them between the two bins. The bedding consists of shredded cardboard / brown paper and coffee grounds. I wet the cardboard until its only slightly dripping when I wring out a handful (similar to how I mentioned in above Compost section). I lay the bedding about 5-6" deep and I bury the food scraps with crushed egg shells. On average, I add about a pound of food scraps per week to each bin but I will add less if I still see some scraps from the previous feeding still in the bin. Bins are slightly more productive in the summer months than the winter months. I cover the bedding with a plastic-wrapped piece of cardboard (with recycled burlap sacks cut to the same size, for extra winter warmth) to retain moisture / heat in the bins but leaving a 1" gap around the edges, to allow for some airflow. The more airflow, the faster you dry out the bins, which need to stay moist to keep the worms happy; you do not want escaping worms but I have been keeping mine indoors without any issues or escape artists. Each time I feed, I add a little bit more bedding to the top, as the level will go down as the food is processed by the worms and microbes. You want to maintain a slightly higher C:N ratio than normal compost, around 35:1. I usually spray some (de-chlorinated) water into the bin if I noticed any very dry spots, aside from adding the new pre-wet bedding
When you are ready to harvest, don't feed for 2 weeks to allow the food to be completely finished. For harvesting castings, I use a sifter with different size grates, starting larger and moving down to the smallest. Before I sift, I scrape the top layer of bedding off and save it for the next batch. You will notice the bottom layers are all worm castings, its ok if you have some worm castings in the bedding you are saving, this is good for "starter" in the next batch. The time consuming part is sifting and removing the worms from the finished castings. Once you are done, you will have your finished castings separated from your fresh bins which can be topped off with some new bedding (in addition to the saved bedding from the last run)
I only had one issue after about 2 years, which was fungus gnats. They appeared in somehwere betwen tens and a hundred; crawling around and flying around, often connecting to each other while they mate (and walk around while they mate, I thought they were 2 different bugs at first). I added sticky traps, kept the top layer of my bedding dry and couldn't get rid of them for weeks. What ended up resolving this was dousing the top layer of bedding with BTI, which is a Lacto-bacillus based larvicide used for mosquitoes, fungus gnats and other fly larvae. It doesn't kill the adult gnats but taints the eggs and kills larvae once they hatch. Adult fungus gnats lifespan is only about a week, so once you rid of the larvae, you don't have to wait that long until you are in the clear. It is safe and not harmful to worms, so I was happy with this solution. You put a few teaspoons of it in a tea bag and drop it in a sprayer bottle and let it steep for a few hours before using it. Fungus gnats like moist soil to lay their eggs (or worm bin bedding in this case), so while you are treating, also keep the bins away from house plants, etc.
Upcycling
I'm not very crafty and am probably missing out on some good ideas for upcycling but I tend to clean / keep things like large emptied yogurt containers, glass jars / bottles, food safe buckets for storage of things and sturdy milk / juice jugs (good for starting seedlings outdoors which need cold stratification as they are clear and let sun through). Really it is up to you to keep what you think you can re-use. I get food safe 5 gallon buckets from my local bakery which were used for things like pie filling, creams, etc. and I just clean them and re-use them for storing things like bird seed / nuts, worm castings, shredded cardboard and more.
Recycling
If you can't find uses for things (like the unsafe-for-compost cardboard or other plastics, etc.), recycle them with your municipality, if a recycling program is available; see what they will take in and be respectful of the program by making sure to rinse things out before recycling or following their other procedures which are usually documented on their website or you can find out by calling them. There are other specialty recycling programs for things your municipality won't take like electronics, used motor oil (most autopart stores take used motor oil in low personal amounts) or if you feel safe with taking things apart, you can strip precious metals like copper / others from things you were otherwise going to discard and to take them to a local metal recycler where you are paid for them.
Books
Here are some books that I have found beneficial to learning more about Permaculture and subjects surrounding it:
- Permaculture: A Designers' Manual by Bill Mollison
- Teaming with Microbes by Jeff Lowenfels and Wayne Lewis
- Teaming with Nutrients by Jeff Lowenfels
- Teaming with Fungi by Jeff Lowenfels
- Soil Biology Primer by Elaine Ingham
- The Field Guide I for Actively Aerated Compost Tea by Elaine Ingham
- The Field Guide II for Compost Tea by Elaine Ingham
- Practical Permaculture by Jessi Bloom and Dave Boehnlein
- Gaia's Garden: A Guide to Home-Scale Permaculture by Toby Hemenway
- JADAM Organic Farming by Youngsang Cho